For top sides, first thing we had to do was to get the exact pattern of the form in real size and we used spiling method.
Picture above show how we do the spiling and we learned this technique while we were building a dory.
What we need is long piece of thin board which is flexible enough to fit the curve of the hull and not too soft. We fix it onto hull with clamp or nail then measure distance between the edge of the hull and specific points on the board.
With this measure, we do lofting on cardboard. Then we get the pattern in real size.
We fitted the pattern on the hull and made pattern out of foam then did dry fit and adjustment many times but result was unsuccessful.
Then, Chris gave us idea of scribe and tool made of thin piece of tin. We also learned this technique when we got the shape of skeg for dory. Many times of adjustment was just done in a first try.
Since the foam for top sides were not big enough we made one side of sides with two pieces of foam and it needed to be butt jointed before we fit it onto hull but we were a bit behind the schedule we decided to go for foam butt joint and hull fitting at a time. So we marked on the foam its direction(forward/after), side(port/starboard) to avoid confusion while we are busy to finish gluing within short pot life
We mask taped hull area under chine line and foam to avoid hull from being contaminated with glue and cleaned up the hull before we start gluing for joint.
We used nails to fix the foam into hull. Nails for foam? It seems not a good idea because it means lots of filling job. Maybe the long piece of wood block to hold cockpit side in position could be a good alternative but we used nails and we had fill the holes.
We mixed resin with glue and filler powder altogether to make glue and filler powder makes the glue more grey. Now you know why we need masking tape for the hull and removing squeezed glue gives less work.
Combination of concentration on work and messy or unorganized environment creates trouble. So always be cautious and keep work environment organized.
Nail was also used to fix the foam to foam and wooden hull. One thing to note here is not to forget to remove those nails later because it is easy to forget about the nails because it's small and some are placed in somewhere out of our sight.
We left bow of the top sides untouched because later we will fit nose cone in there.
We found some points of the foam are not fair and we needed to fix it. So we used small pieces of wood block to hold the foam in position and make it fair. Also we used nails to make foam fair and to touch the frames as below.
And after checking and fixing the foam to be fair, we came up with a holder which can hold top sides in position while glue's going hard.
For nose cone we didn't have specific plan so we had find out how we make it. This is my method.
In ACAD drawing, draw circle which is tangent to both sides and get the position of its center and transfer it to profile view. then, draw circle on chine line and one more at right in the middle of those two circles in profile which has the same center line and tangent to the sides. Then we get the shape and measure of nose cone.
In ACAD drawing, draw circle which is tangent to both sides and get the position of its center and transfer it to profile view. then, draw circle on chine line and one more at right in the middle of those two circles in profile which has the same center line and tangent to the sides. Then we get the shape and measure of nose cone.
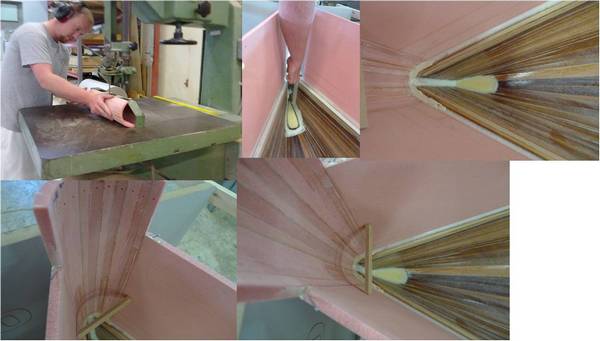
So we got the mold and foam to be stripped. We made female mold and I think it's more easy to make than male mold.
And I told guys that I think it needs to be beveled cause it has curve. Result came out and as you see, inside of the cone is nice but outside of cone has lots of gaps between foam. And they said they were planning to fill the gap with glue, which means our enemy - the weight.
Chris also point out that it needs to be beveled and we did it again.
Chris also point out that it needs to be beveled and we did it again.
Foam was stripped with band saw using bevel table.
This time it fitted well and later after coving the water splash(not exact term for it), we fixed it onto top sides


Jade this is another excellent blog. It shows again that your understanding of the issues is excellent. You have shown correct techniques and explained these well. Also you have pointed out errors and explained how these occured and how to solve the problems. Great work. Keep this up.
ReplyDelete